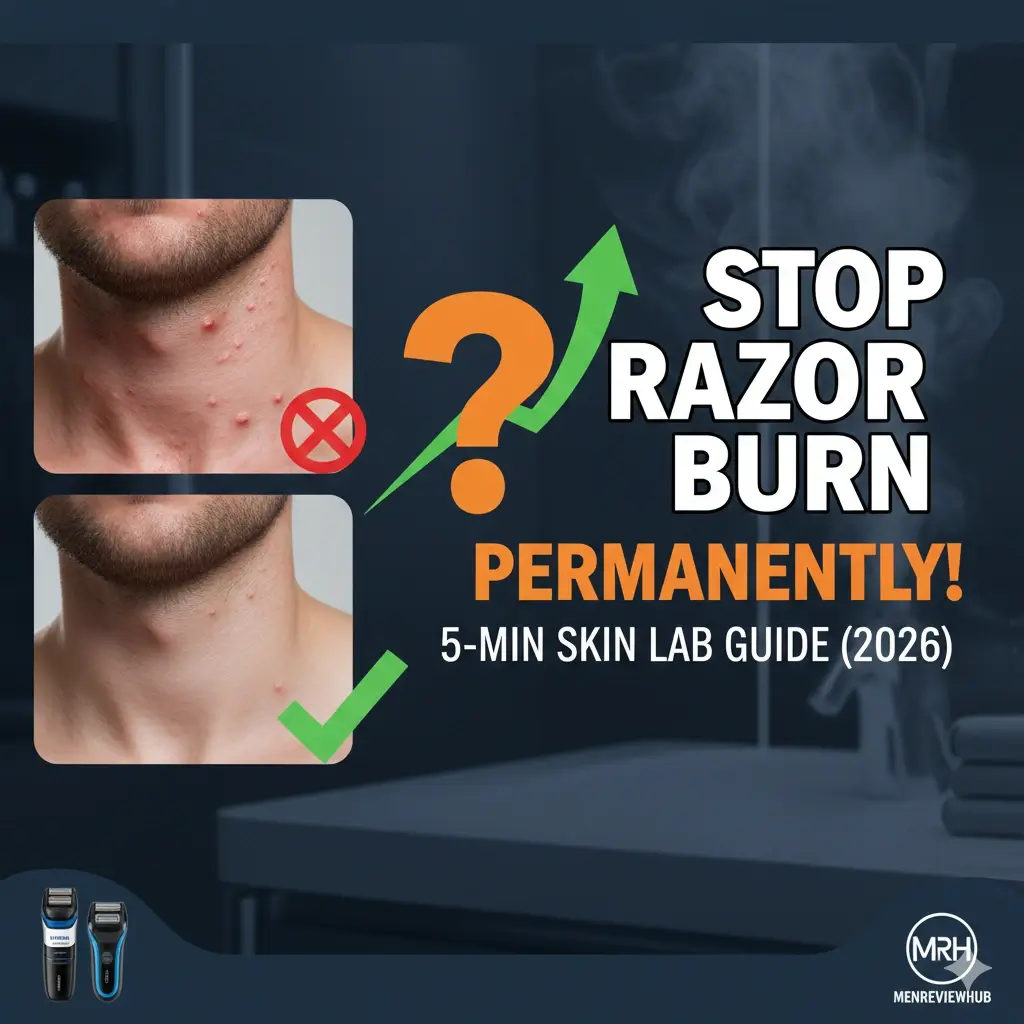
How to Stop Razor Burn: An Expert’s Guide to Redness-Free Skin
We have all been there. You finish up your morning shave, look in the mirror, and for a fleeting second, everything looks perfectly clean. But then, the familiar heat sets in. Within ten minutes, your neck breaks out into a map of uncomfortable red bumps and that undeniable, stinging sensation. If you find yourself constantly searching for how to stop razor burn, I want to reassure you right now: you do not have “bad skin.” You simply have a grooming routine that is working against you.
A great shave shouldn’t feel like a daily battle with your face. Over my years of testing grooming gear, I’ve learned that with the right preparation and modern, skin-friendly tools, dealing with severe irritation is entirely optional. In this guide, we are dropping the complicated marketing jargon to give you a practical, tried-and-true 5-step routine. Let’s transform your morning shave from a painful chore into a smooth, comfortable experience.
⚡ Quick Summary: Your Skin Defense Protocol
If your neck is currently stinging and you need actionable advice right this second, here is the honest, no-fluff breakdown on exactly how to stop razor burn:
- The Root Cause: Razor burn is the direct result of blade friction, pressing down too hard, or using a dull edge that scrapes away your skin’s natural moisture barrier.
- The Essential Prep: You need to soften your facial hair with warm water for at least 2 minutes before shaving. This simple step cuts down cutting resistance significantly, making each pass effortless.
- The Tool Upgrade: It might be time to toss out multi-blade cartridge razors. Switching to skin-friendly electric options like the Philips OneBlade 360 or a capable, high-torque choice like the Panasonic MultiShape makes a world of difference.
- The Cool Down: Always finish up with a splash of cold water to calm the skin, and apply an alcohol-free balm packed with soothing ingredients like Niacinamide or Aloe Vera.
1. Understanding the Cause: Why Razor Burn Happens
To put an end to razor burn for good, it helps to realize that your skin isn’t overly sensitive by nature—it’s simply reacting to intense friction. True razor burn (the warm, red surface rash) and painful razor bumps (ingrown hairs) are the direct result of how a blade interacts with your pores.
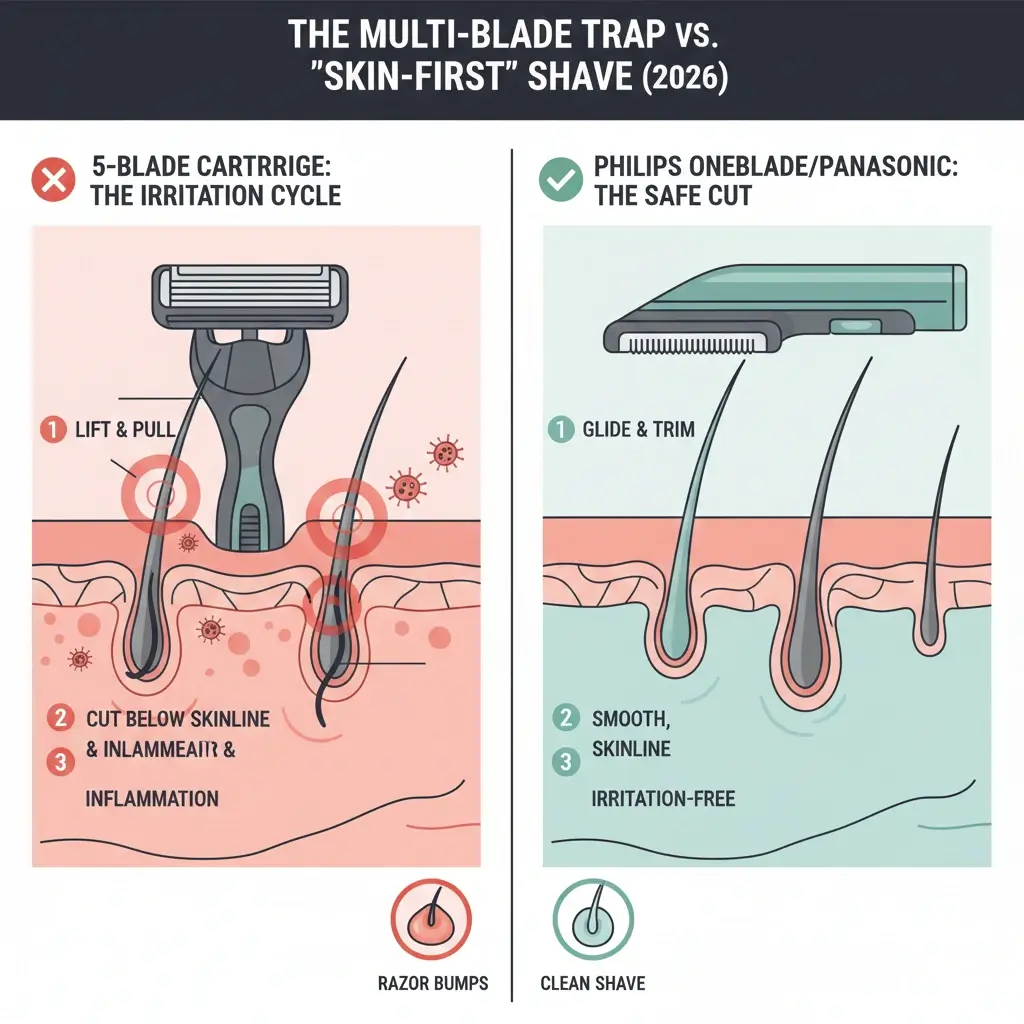
🛑 The Multi-Blade Dilemma
Many standard 5-blade cartridges rely on a “lift and cut” mechanism. The first blade pulls the hair up, and the following blades cut it slightly below the skin line. When that hair attempts to grow back, it can easily get trapped under your skin, resulting in an uncomfortable, swollen ingrown hair.
⚖️ Pressing Too Hard
If you find yourself pressing the razor hard against your neck to force a closer shave, your skin will pay the price. A good blade should glide effortlessly; forcing a dull edge against your skin scrapes away the protective top layer of your epidermis, creating tiny, irritating micro-tears.
🔥 Friction and Heat
Friction naturally creates heat. When cheap or unlubricated blades rub rapidly against coarse hair, they warm up quickly. This thermal heat transfer acts as an immediate irritant to your skin, especially around the delicate, sensitive contours of your neck.
2. The Pre-Shave Ritual: Prepping Your Skin
It’s incredibly common to view shaving as a quick chore to rush through. But skipping the preparation step means inviting razor burn straight to your neck. Taking a few intentional moments before the blade touches your face completely changes how your skin reacts.
Step 1: Hydrate and Soften the Hair
Dry facial hair can be surprisingly tough. Trying to cut it completely dry forces the blade to tug and pull, which aggravates the nerve endings in your skin. The Fix: Shave immediately after a warm shower, or hold a warm, damp towel over your face for 2 minutes. Softening the hair makes it up to 30% easier to cut smoothly.
Step 2: Cleanse and Clear the Path
Dead skin cells, daily dirt, and excess oil naturally collect around your hair follicles, creating tiny obstacles for your razor that lead to bumps. The Fix: Wash your face with a gentle, non-stripping cleanser. This clears the surface, lifts the hair slightly away from the skin, and gives your blade a perfectly smooth runway.
Step 3: Lay Down a Pre-Shave Lubricant
This is one of the most underrated steps in a solid grooming routine. Adding a high-quality, lightweight pre-shave oil or gel creates a microscopic layer of glide between the steel and your skin. It greatly reduces friction, allowing the razor to cut the hair without scraping your face. Look for clean blends with Jojoba or Vitamin E oil.
3. The Right Hardware: Upgrading Your Tools
If you are still using a dull multi-blade cartridge and wondering why your neck looks irritated, it might be time to rethink your gear. To truly master how to stop razor burn, you want tools specifically designed to respect your skin barrier while still delivering a clean, sharp look.
The Skin-Friendly Choice: Philips Norelco OneBlade 360
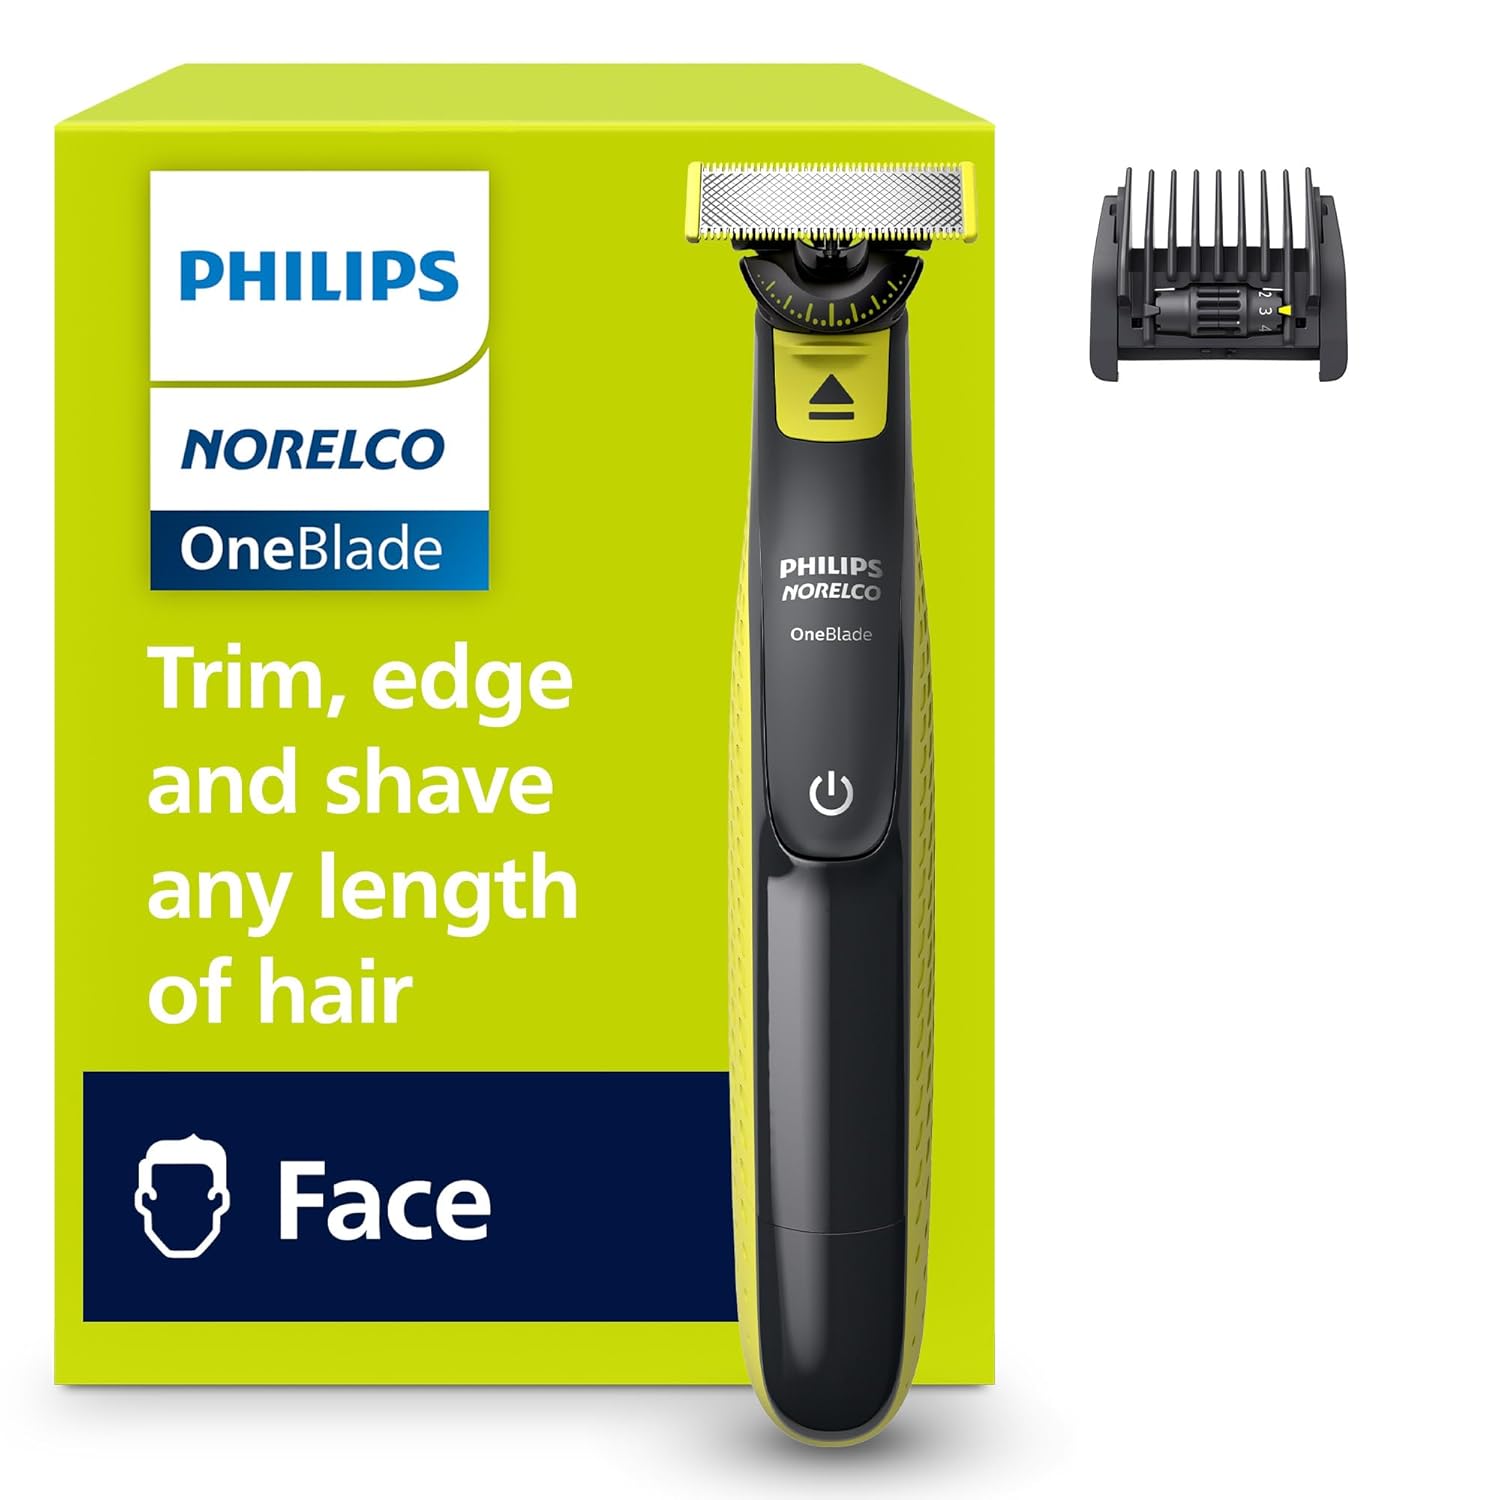
For guys with highly sensitive skin that seems to break out no matter what, the OneBlade 360 is a fantastic, reliable option. Instead of sitting flat against your face and scraping the skin like a traditional razor, it relies on a fast-moving cutter protected by a smooth glide coating.
- Comfort-First Edge: It deliberately doesn’t cut 100% flush to the skin—and that is exactly why it works so beautifully for sensitive necks. It trims the hair just a fraction above the skin line, essentially eliminating the risk of ingrown hairs.
- Smart Pivot Design: The updated 360 Pivot Head smoothly adjusts to the unique contours of your chin and jawline, saving you from having to press down or pass over the same spot repeatedly.
The Reliable Performer: Panasonic MultiShape

If you happen to have a thick, coarse beard but your skin underneath gets irritated easily, you need a motor with steady, reliable cutting power. Weak trimmers tend to struggle and slow down, causing them to snag and yank on thick hair—a surefire way to trigger bad razor bumps.
- Consistent Power: The Panasonic MultiShape utilizes a highly capable motor that maintains its speed even when driving through dense patches of hair, preventing painful snags.
- Precision Japanese Blades: The sharp, durable stainless steel blades are honed to cut cleanly with minimal friction, helping them stay remarkably cool against your skin.
- A Smart, Modular Kit: It functions as a complete grooming system, using a single high-performance power base that easily connects to all your different heads (Beard, Hair, and Body).
4. Shaving Technique: Mastering the Gentle Touch
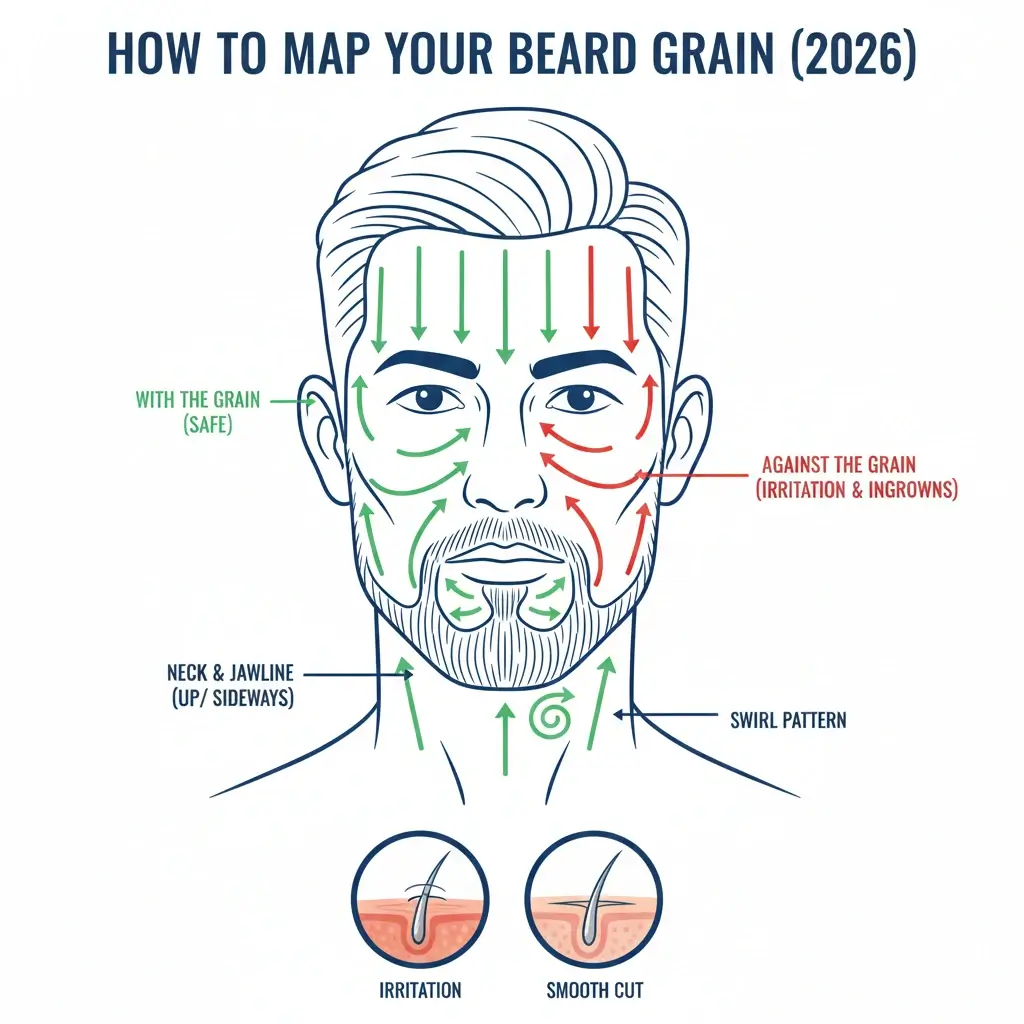
Green Arrows = With the Grain (Safe), Red Arrows = Against the Grain (Irritation).
You could own the most advanced trimmer in the world, but if you press it hard against your face, you are likely to get burned. One of the biggest mistakes I see guys make is applying way too much manual pressure. To truly learn how to stop razor burn, you want to let the tool do the work and guide it with a light touch.
Rule #1: Map the Direction of Your Hair
Beard hair rarely grows straight down. Especially on your neck, it might grow sideways, diagonally, or even in a swirl pattern. The Pro Move: Run a clean fingertip across your stubble. The direction that feels smooth is “with the grain”; the direction that feels scratchy is “against.” Shaving directly against the grain is the easiest way to pull the hair back into the skin and cause painful bumps.
Rule #2: Lighten Your Grip
Modern electric tools are engineered with capable motors for a reason—they are meant to do the heavy cutting for you. Hold the handle lightly, almost like a pen, rather than gripping it like a heavy wrench. If you hear the motor pitch change or strain, you are pressing far too hard against your skin.
Rule #3: Limit Your Passes
Every time a blade passes over your skin, it doesn’t just cut hair—it removes a thin layer of your skin’s natural moisturizing oils. Aim for one or two clean, steady passes over any single spot. If you missed a tiny hair, dab a bit of shave gel back onto the area before cleaning it up to keep your skin protected.
5. Post-Shave Recovery & Simple Gear Care

The routine doesn’t end the moment you put the razor down. The five minutes right after you finish determine whether your skin stays comfortable all day or experiences an irritating flare-up. Your pores are open, and your skin barrier is fresh—you want to soothe it immediately.
❄️ Calming the Skin
- The Cold Water Rinse: Splash your face with cool or cold water right away. This simple step helps soothe and instantly calm skin redness.
- Skip the Alcohol: If your current aftershave gives you an intense, painful burn, it is time to swap it out. Stick to Alcohol-Free Balms containing comforting ingredients like Niacinamide, Aloe Vera, or Hyaluronic Acid to put moisture straight back into your skin cells.
- Lock In Hydration: Follow up with a simple, clean, pore-safe moisturizer to keep your face feeling smooth and protected against the elements throughout the day.
🔧 Looking After Your Gear

- Don’t Use Dull Blades: Old steel blades naturally develop microscopic nicks that pull on your hair. Make it a habit to replace your trimmer or shaver heads every 3 to 4 months to keep the cut perfectly smooth.
- Keep It Clean: Give your blade heads a quick rinse under the tap or use a basic shaver cleaning spray to clear away hair clippings and skin oils, keeping bacteria from building up.
- Keep Friction Low: For standard trimmers, adding a single drop of clipper oil once a month works wonders to keep the blades moving smoothly, reducing friction heat against your skin.
6. Common Questions Answered
How long does a typical razor burn usually last?
For most guys, standard surface redness and irritation will clear up on their own within a few hours to a couple of days. However, if the little red bumps persist for longer or feel deeply tender, you might be dealing with mild folliculitis (irritated or clogged hair follicles), which requires a little extra rest and gentle care.
Can I apply raw Coconut Oil to treat razor burn?
It’s generally best to avoid heavy oils on your face. While coconut oil is a fantastic natural moisturizer for your body, it is highly comedogenic—meaning it has a thick texture that easily clogs facial pores. This can trap bacteria and turn standard razor irritation into minor breakouts. Stick to lighter options like Jojoba oil, Aloe Vera, or Niacinamide-based balms instead.
Is it safe to shave or tidy my beard lines every single day?
If you are using a standard multi-blade cartridge razor that pulls on the root of the hair, shaving daily will likely keep your skin irritated. However, if you switch to a highly protective tool like the Philips OneBlade 360, daily upkeep is perfectly fine. Because its design keeps the moving blades a fraction of a millimeter away from scraping your actual skin surface, it leaves your skin barrier comfortably intact.
🔗 More Tried-and-Tested Grooming Guides
Building a comfortable grooming routine is all about choosing the right tools and steps for your specific skin type. To explore more tested recommendations and keep your face feeling its best, check out our deep dives below:
- Looking for Premium Performance? If you want to see how the top-tier high-end shavers handle sensitive skin, check out our full Panasonic Arc6 vs Braun Series 9 Pro+ comparison.
- Finding the Perfect Gift: If you’re looking to upgrade a routine for someone else, explore our curated list of the Best Gifts for Men Who Love Grooming.
- Immediate Post-Shave Comfort: To find a balm that hydrates without a painful sting, take a look at our honest, real-world Bee Bald HEAL Review.
- Total Scalp Protection: If you shave your head and want to prevent redness and dryness up top, don’t miss our comprehensive Mountaineer Brand Bald Head Care Review.

“Adam Lee is the lead technical reviewer at MenReviewHub and a veteran of the traditional wet shaving community. With over a decade of hands-on experience, Adam specializes in dissecting high-performance grooming hardware and dermatological skincare. He doesn’t just ‘read the box’—he puts every product through a brutal 30-day real-world trial to ensure your morning routine is a tactical success, not a crime scene.”