The “Essential Maintenance” Kit: Setting Yourself Up for Success
When your clippers start acting up, it is incredibly tempting to grab an old, frayed toothbrush and whatever household lubricant is sitting in the back of the garage, thinking you’re being resourceful. But let’s take a step back. Your facial skin and your scalp are highly sensitive, and your precision blades require specific, gentle care to thrive. Using harsh chemicals or heavy greases can actually accelerate the destruction of your tools.
Before you master how to clean and oil hair clippers, you need the right supplies. To execute the professional 5-Point Method correctly, you need what we call the “Holy Trinity” of clipper maintenance. These items are inexpensive, last for years, and belong in every man’s grooming drawer.
Your Quick Gear Summary
| The Essential Tool | Why Your Clippers Need It | The Pro Choice |
|---|---|---|
| Premium Clipper Oil | Dramatically reduces friction, lowers heat, and prevents microscopic rust. | Wahl Premium Oil |
| 5-in-1 Care Spray | Instantly disinfects bacteria, cools hot blades, and flushes out trapped debris. | Andis Cool Care |
| Stiff Cleaning Brush | Safely digs out the dense “hair jungle” packed tightly against the motor. | Pro Clipper Brush |
1. The Lifeblood: High-Grade Clipper Oil
It is a very common misconception that any oil will do. However, your kitchen’s olive oil or coconut oil is strictly meant for food, not high-speed steel. Organic oils will eventually turn rancid, creating a sticky, gummy paste that chokes your motor. Real clipper oil is a highly purified, extremely lightweight mineral oil. It is meticulously designed to withstand intense RPMs without evaporating or turning into sludge.
- The Trusted Choice: We consistently recommend Wahl Clipper Oil. It is the gold standard in barbershops worldwide for a very good reason. It’s perfectly formulated to be thin enough to penetrate the microscopic gaps between your blades, yet viscous enough to stay exactly where it needs to be. Learning how to clean and oil hair clippers starts with this single bottle.
2. The Multi-Tasker: 5-in-1 Disinfectant Spray
If you have ever felt your blades getting uncomfortably warm against your neck mid-shave, you know how concerning that feels. A premium spray like Andis Cool Care Plus is an absolute game-changer. It acts as an instant coolant, a medical-grade disinfectant, a light lubricant, a cleaner, and a rust preventative all in one quick blast.
- The Barber’s Secret: You can actually use this spray during your grooming session if the blades start to feel warm. It acts as an instant, soothing “reset button” for your clipper’s temperature, protecting your skin from thermal irritation.
3. The Gentle Excavator: A Stiff Cleaning Brush
Here is a crucial rule of maintenance: you can never, ever oil over dirty hair. If you do, the oil binds with the hair dust to create a coarse “sludge” that acts exactly like sandpaper on your delicate blades. You need a reliable, stiff-bristled brush to gently but firmly clear the hair trapped around the motor drive and the delicate teeth.
- Our Recommendation: It’s usually best to skip the tiny, flimsy brush that comes free in the box. Invest a few dollars in a proper Long-Handle Cleaning Brush so you can comfortably reach into the deep crevices without getting fine hair splinters under your fingernails.
A Gentle Warning from the Hub: We see this advice floating around the internet constantly, but please, never use WD-40 on your clippers. WD-40 is a fantastic solvent designed specifically to remove grease and displace water. If you spray it on your clippers, it will aggressively strip away any existing, helpful lubrication and cause your blades to dry out and seize up within minutes. When figuring out how to clean and oil hair clippers safely, always stick to products made for grooming.
Phase 1: The Gentle “Deep Scrub” (Cleaning Your Clippers)
It is a very common morning habit to simply blow the loose hair off the blades, give them a quick tap on the sink, and put them back in the drawer. We have all been there, especially when we are rushing to get to the office. But to keep your tool running beautifully and to protect your skin from bacteria, we need to go just a little bit deeper.
Learning exactly how to clean and oil hair clippers doesn’t have to be a tedious chore. In fact, once you get the hang of it, this entire process takes less than two minutes. Here is the professional, three-step protocol for a true, gentle deep clean that will breathe new life into your grooming routine.
Step 1: The Dry Brush (Clearing the Canvas)
The first true step in understanding how to clean and oil hair clippers is safely removing the physical debris. Hair, microscopic dead skin cells, and natural scalp oils act like a sponge for bacteria. You must remove these dry elements before introducing any liquids.
- The Gentle Move: Ensure the clipper is turned completely OFF and unplugged. Use your stiff cleaning brush to methodically sweep out the hair trapped between the delicate teeth and around the side taper lever.
- The Hidden Spot: Don’t forget the small gap right behind the blades where the internal motor arm sits. If fine hair quietly builds up in this “trap,” it puts unnecessary strain on the motor, leading to that loud, tired vibrating sound.
Step 2: The Disinfectant Flush (Cooling & Purifying)
This is the step that protects your skin. If you’ve ever experienced annoying razor bumps, redness, or “barber’s itch” after a fresh trim, it is almost always due to microscopic bacteria living on unwashed blades.
- The Technique: Turn the clipper ON. While the blades are humming, hold the tool over a sink or towel and spray your 5-in-1 Care Spray directly onto the moving teeth.
- Why Keep It Running? The high-speed vibration acts as a mechanical pump, gently forcing the purifying liquid deep into the microscopic gaps between the moving and stationary blades, flushing out hidden gunk you can’t even see.
- Patience is Key: Turn the machine off and let the spray sit for about 2 minutes. Medical-grade disinfectants require a little bit of “contact time” to effectively neutralize bacteria.
Step 3: The Monthly “Under the Hood” Reset
If you are figuring out how to clean and oil hair clippers for the long haul, you will eventually need to look inside. Once a month (or every two weeks if you are fading your hair frequently), it is highly beneficial to do a deeper reset.
- The Careful Reveal: Grab a standard screwdriver and gently remove the two screws holding the large stationary blade in place. You might be surprised by the amount of compacted hair resting inside the motor housing. Gently sweep it all out.
- The Safe Re-alignment: When you place the blades back together, ensure the top (moving) blade is resting slightly behind the bottom (stationary) blade—roughly 1/32 of an inch. If they are perfectly flush, you run the risk of the sharp moving teeth nicking your skin.
The Intuitive “Smell Test”
We trust our senses for a reason. If your clippers ever develop a faint odor reminiscent of old gym socks or damp towels, they are likely harboring bacteria and degraded organic oils. Please do not use them on your sensitive skin. Perform the deep scrub protocol immediately to restore their hygiene.
Phase 2: The Professional 5-Point Oiling Method
If you skip the lubrication phase, you are essentially asking two pieces of dry steel to rub against each other thousands of times a minute. That lack of a protective barrier creates immense heat, which softens and dulls the steel, forcing your internal motor to work twice as hard to compensate. Eventually, the motor quietly burns out, and you’re left wondering what went wrong.
When our readers ask us exactly how to clean and oil hair clippers, the 5-Point Method is the foundational technique we teach. It ensures perfect, 100% lubrication coverage without creating a messy, greasy puddle that inevitably drips down your hands or traps new hair.
The Step-by-Step Execution:
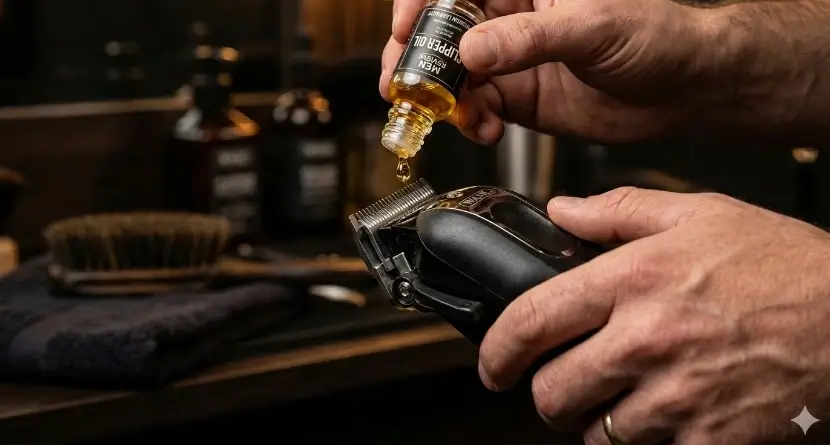
- Power It Up: This is a non-negotiable step. You need the blades to be actively moving so the oil can naturally migrate across the entire cutting surface through capillary action. Turn the clipper ON.
- Points 1, 2, & 3 (The Teeth): While it is running, apply exactly one drop of Premium Clipper Oil on the far left corner of the blade teeth, one drop in the dead center, and one drop on the far right corner.
- Points 4 & 5 (The Heels): Now, look closely at where the moving top blade meets the stationary bottom blade on the sides. Apply one drop to each “heel” or side rail. This is where the heaviest friction naturally occurs, and it’s the vital step most people innocently forget.
- The “Lever Workout”: With the motor still humming beautifully, gently toggle your taper lever (the adjustable handle on the side) up and down for about 10 to 15 seconds. This simple motion forces the nourishing oil into every microscopic groove of the blade assembly.
- The Crucial Wipe-Down: Turn the machine off. Take a soft, lint-free microfiber cloth and gently dab away any excess oil from the exterior.
- The Expert Nuance: You are aiming for a microscopic, invisible film of protection, not a wet, dripping surface. If the blades look overly glossy, the next time you cut your hair, the clippings will stick to the oil, creating a gritty paste that dulls the metal.
The “Sound Test”: Listening to Your Tools
A seasoned barber can often tell if a clipper is thirsty for oil simply by closing their eyes and listening to the motor. It is a subtle but recognizable shift.
- The Dry Cry: If your clippers suddenly sound higher-pitched, slightly metallic, or have a hollow “rattle,” they are bone-dry and crying out for lubrication.
- The Satisfied Purr: Immediately after executing the 5-Point Method, you should hear the tone drop into a deep, consistent, satisfying hum. When you master how to clean and oil hair clippers, maintaining that smooth purr becomes second nature.
Can You Over-Oil Your Clippers?
It is a fair question, and the answer is absolutely yes. We often think more is better, but if you flood the blades with oil, the excess liquid will eventually seep past the blade seal and directly into the internal electronic motor housing. Over time, this coats the delicate copper wiring in a sticky grime that traps heat and causes the unit to overheat. Trust the process, trust the 5-drop rule, and your equipment will thank you.
Phase 3: The Maintenance Schedule for Every Guy
Understanding exactly how to clean and oil hair clippers is only half the battle; knowing when to do it makes all the difference. Your ideal maintenance schedule depends entirely on how often you pull the tool out of the drawer. You don’t need to overcomplicate this.
1. The “Weekend Warrior”
If you are just cleaning up your sideburns or trimming your beard once a week, you certainly don’t need a full teardown every day. However, you should never put your clippers away dirty.
- The Routine: A quick dry brush and a blast of disinfectant spray after every single use. Apply your drops of oil right before you put them back in the drawer.
- Why? The natural humidity in your bathroom causes microscopic rust on high-carbon steel. The fresh oil acts as a waterproof seal while the tool sits idle all week.
2. The “Household Barber”
If you are fading your own hair, cutting your kids’ hair, and maintaining a thick beard every few days, you are putting high mileage on those blades and need a tighter routine.
- The Routine: Oil them every time you turn them on. Perform the Deep Scrub (removing the blades) every two weeks to clear the motor trap.
- Why? The constant, heavy friction requires fresh lubrication constantly, and the sheer volume of clipped hair means the internal trap will fill up much faster.
The Most Expensive Mistakes You Can Make
Even guys with the absolute best intentions can accidentally ruin a great pair of clippers by trying to take shortcuts. Mastering how to clean and oil hair clippers also means knowing exactly what to avoid to protect your investment.
Mistake 1: The “Kitchen Cabinet” Substitute
Vegetable oil, olive oil, and coconut oil are wonderful for cooking, but they are a death sentence for delicate grooming hardware. These organic oils rapidly oxidize and go rancid over time. They transform into a sticky, gummy adhesive that clogs the motor, slows down the RPMs, and attracts harmful bacteria. Please, stick strictly to professional mineral oil.
Mistake 2: Oiling Over Dirty Blades
If you haven’t used your stiff cleaning brush to remove the hair first, adding oil is a terrible idea. The fresh oil immediately mixes with the tiny, sharp hair clippings to create a highly abrasive paste. Instead of protecting the blades, you are essentially sanding them down from the inside every time you turn the motor on. Always remember: brush first, oil second.
Mistake 3: The Water Wash
Unless your specific trimmer is heavily advertised as “100% Waterproof” for shower use, keep it far, far away from the bathroom faucet. Just a few drops of water inside the housing can cause a short circuit or kickstart the oxidation process on your high-carbon steel blades. If you need to “wash” them, rely entirely on your disinfectant spray.
Final Thoughts: A Few Minutes Now, Years of Perfect Shaves Later
At the end of the day, understanding how to clean and oil hair clippers is the defining difference between guys who constantly have to replace broken, painful gear and guys whose grooming kits last an entire lifetime.
Treat your clippers like the precision instruments they truly are. They will reward you with crisp, clean fades, zero skin irritation, and a motor that purrs smoothly every single morning. Don’t wait for the blades to start screaming or pulling your hair. Grab your Wahl Clipper Oil, follow the 5-Point Method, and make basic maintenance a natural part of your routine. Your skin, and your wallet, will absolutely thank you.
Ready to Elevate Your Grooming Setup?
Maintenance can save a dying tool, but it can’t turn a cheap toy into a professional powerhouse. If your current set is beyond saving, or you just want to seriously upgrade your home barbering skills, check out our latest deep dives:

“Adam Lee is the lead technical reviewer at MenReviewHub and a veteran of the traditional wet shaving community. With over a decade of hands-on experience, Adam specializes in dissecting high-performance grooming hardware and dermatological skincare. He doesn’t just ‘read the box’—he puts every product through a brutal 30-day real-world trial to ensure your morning routine is a tactical success, not a crime scene.”